WARNING This method is now considered unreliable due to the load it places on CSE servers, and may be blocked by CSE’s System Support at any time. Check out this newer post instead. Do not use this on CSE.
Hi there! If you’re new here, welcome to CSE! We’re going to be setting up a text editor called Visual Studio Code, or VS Code, to remotely work on the CSE computers without needing a VNC client!
Why are we doing this?
You’ve likely used a program called TigerVNC to connect to the School of CSE’s computers before, which provides you a visual interface with a full desktop environment, very similar to the experience you would get out of sitting in front of a physical computer on campus.
More importantly, under normal circumstances, you would be doing your exams in front of a similarly configured physical computer on campus. As of the start of 2021 however, it seems you’re generally free to use whatever setup you wish.
The solution we’re about to go through provides a more seamless coding experience without having to load a full visual interface from CSE computers. This has the added benefits of not being affected by compression, especially if you have a poor connection, and other latency issues.
I don’t particularly recommend this for first years, but if you’re a more experienced user with your own local setup, you might want to checkout this more lightweight method here.
Getting started
First of all, we’re going to acquaint ourselves with Visual Studio Code, or VS Code. You’ve likely been introduced to a tool called gedit which allows you to write files of text (including code), or what’s called a text editor. VS Code does th is, but it provides many more great features on top. To get started, you’ll need to install VS Code on your own computer, whether it be Windows, macOS or Linux.
- If prompted to do so during the installation process, select the checkbox which says ‘Add to PATH’.
- Restart your computer once you’re done.
You should now have VS Code installed! You can now edit files on your own computer, but that’s not quite what we want - our goal is to edit files on CSE machines.
Our friend, SSH
SSH, or Secure Shell, is a protocol which allows us to edit files on another computer, such as the CSE servers, and run commands through a terminal on CSE servers.
Luckily for us, VS Code has a way to use SSH to allow you to edit files and run commands on other computers.
If you’re on macOS, use Cmd instead of Ctrl.
Part 1: Getting started
- Open VS Code.
- Open the Extensions menu. You can access it using
Ctrl+Shift+X. - Search for and install the Remote-SSH extension. Once this is done, you might be prompted to reload the window.

Part 2: Improving security
Not performing this step can make your CSE account accessible to anyone while you’re connected. Accounts that don’t enable this will not be able to use VS Code to connect to CSE computers in the future.
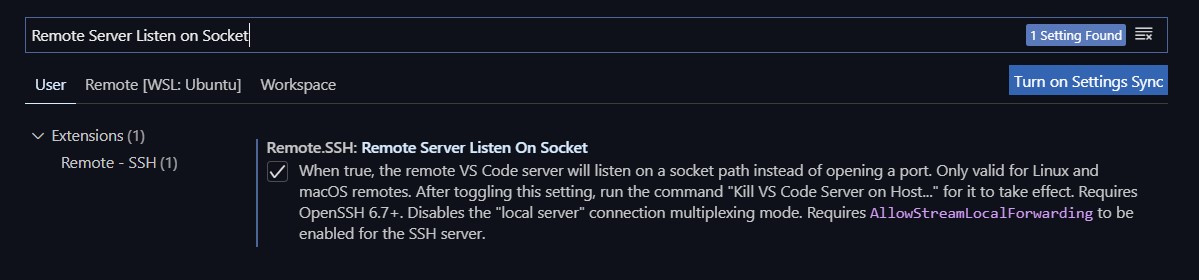
- Open the VS Code settings pane. To do this, click the settings icon near the bottom left, or use
Ctrl+,. - Search for ‘Remote Server Listen on Socket’. Tick the corresponding checkbox once it appears.
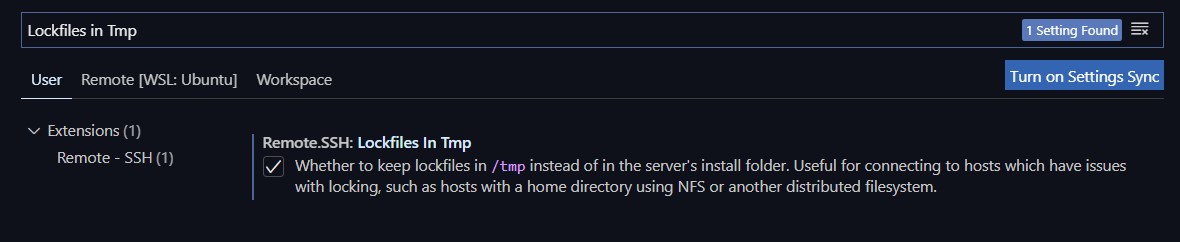
- Search for ‘Lockfiles In Tmp’. Again, select the corresponding checkbox.
- Close and reopen VS Code.
Congrats! You’re now safer from nefarious hackers, or inadvertent intruders.
Note: If you’re coming here from the older version of my guide, please switch to using vscode.cse.unsw.edu.au, rather than login, wagner, weill or williams. If not you can ignore this.
Part 3: Logging in
Open the Remote-SSH menu. This can be done by clicking this button
 in the bottom left. The menu should look like this:
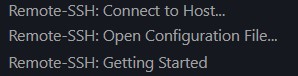
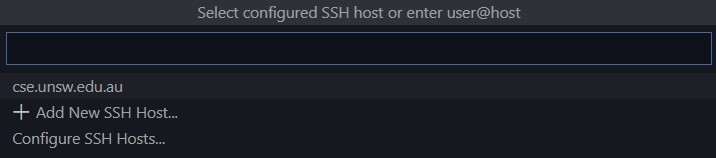
Click Connect to Host. In the field that shows up, type in
z5555555@vscode.cse.unsw.edu.au, using your zID instead. Hit Enter. A new window will open.If asked to select a remote platform, select Linux.
Enter your password when prompted. If your password is wrong, you will prompted to retry. Once you’ve done that, you should be connected successfully!
- Use Ctrl+O to open a file.
- Use Ctrl+` (that’s the key to the left of the number row) to open a terminal pane.
This is exactly like a terminal window in TigerVNC. You can run
lsto see your files!
We can save some time by adding this to our hosts list. Click the SSH icon in the bottom left again, click Connect to Host, and this time, click Add New SSH Host.
Enter the following command:
ssh z5555555@vscode.cse.unsw.edu.au, replacing with your own zID again, and hit Enter. If prompted which configuration file to save to, select the first one.You should now see vscode.cse.unsw.edu.au on the Connect to Host menu. This means you don’t have to type it in each time.
Part 4: vscode2 - Electric Boogaloo
vscode.cse.unsw.edu.au connects you to a CSE server called corelli, which works fine most of the time. However, the server software VS Code uses in order to form a connection is quite resource intensive, and can often eat up all the resources that corelli has available.
Thankfully, CSE has set up a second server called mandolin you can use in case you’re having issues with corelli.
To set up your VS Code to be able to connect to mandolin, repeat Part 3, but replace all occurrences of z5555555@vscode.cse.unsw.edu.au with z5555555@vscode2.cse.unsw.edu.au. That’s right, you just need to stick a 2 after vscode!
You can connect to mandolin if corelli ever feels slow, which it might during assignment season.
Making VS Code even cooler

Editor rulers
The COMP1511 style guide requires you to make sure your lines of code aren’t longer than 80 characters (and it’s good practice to do so!). You can make VS Code show a handy little ruler to make sure your lines aren’t too long.
- Open the settings.json file. To do this, press Ctrl+Shift+P and search for Open Settings (JSON). A file should open.
- We need to add to this file. You should see that the last line is a curly brace like this:
}. What we want to do is add a comma to the second last line. Then, create a new line after the comma, and paste this:
"[c]" :{
    "editor.rulers" : [
        80
    ]
}
The C/C++ extension
The VS Code C/C++ extension will make your life a lot easier when coding. To install it,
- Open a Remote-SSH window and connect to CSE servers.
- Open the Extensions pane by using
Ctrl+Shift+X. - Search for C/C++ and install the extension by Microsoft.
Other extensions
VS Code has heaps of themes and extensions. Some which I use:
- C/C++ Snippets. Occasionally saves time with suggestions. Make sure to install from your Remote-SSH window.
- Material Icon Theme.
- Dainty and Dainty - Material Theme. I personally use Dainty - Material Theme Ocean.
- Discord Rich Presence. If you use Discord, then it’ll update your currently playing status with details of what you’re coding on. If one of your friends tries to drag you into a voice call, you can just open up VS Code and tell them that you’re busy working :P
Bonus coins: SSH and SSH keys
Congrats! You made it to the bonus section. Following these instructions will mean you won’t be asked for a password each time you open a new SSH window, while still keep your connection secure, using magic in the form of mathematics.
Part 1: Generate a keypair
Windows 10
- Open the Windows Command Prompt. You can do this by entering
cmdin Search. - Generate a keypair. Use the command
ssh-keygen -t rsa -b 4096. - You’ll be asked where you want to save the key. Leave this blank, and press Enter.
- You’ll be asked to set a password. Leave this blank, and press Enter again. Do the same when you are asked to confirm it.
- Using the same Command Prompt as before, enter the command
code "%userprofile%/.ssh/id_rsa.pub". This should open up a file in VS Code, starting with ssh-rsa and followed by a long mess of characters. 1 Don’t close this file, but use Ctrl+A Ctrl+C to copy the entire contents of this file.
Linux/macOS
- Open the Terminal.
- Generate a keypair. Use the command
ssh-keygen -t rsa -b 4096. - You’ll be asked where you want to save the key. Leave this blank, and press Enter.
- You’ll be asked to set a password. Leave this blank, and press Enter again. Do the same when you are asked to confirm it.
Your computer has now generated two files: id_rsa and id_rsa.pub. The id_rsa.pub file is what’s called a public key, while id_rsa is a private key. Never share (or even open) your private key. It’s called a private key for a reason :P
Part 2: Using the keypair for CSE machines
Now, we need to tell the CSE computer that your computer is trustworthy, and you are who you claim to be. To do this, we need to give the CSE computer the public key you just generated. If you’re on Linux/macOS, this should be pretty easy, but if you’re on Windows 10, there’s a few more steps.
Windows 10
Using your existing SSH or VLAB connection, open a terminal on the CSE computers. Run the following command. 2
mkdir ~/.ssh;chmod 700 ~/.ssh;touch ~/.ssh/authorized_keys;chmod 600 ~/.ssh/authorized_keys;code ~/.ssh/authorized_keysA window for a file called authorized_keys should open in VS Code. Paste your public key from earlier into this file, and save.
Linux/macOS
Open the Terminal.
Run the following command, replacing with your own zID.
ssh-copy-id z5555555@cse.unsw.edu.auEnter your password. You’ll be asked for your CSE password one last time, for the key to be copied over.
Voila! You had it a bit easier here.
Part 3: Telling VS Code on your computer to use your new keys
- On your local machine, open the SSH menu in VS Code. Click the SSH icon in the bottom left, then Open Configuration File, and select the first option. You should see something like this:
Host vscode.cse.unsw.edu.au
    HostName vscode.cse.unsw.edu.au
    User z5555555

Host vscode2.cse.unsw.edu.au
    HostName vscode2.cse.unsw.edu.au
    User z5555555
- We need to tell the SSH connection to use our private key. Add the following line to your config file, after each of the lines with ‘User’ on it. Make sure to indent it so that it’s in line with the others.
Windows: Make sure to enter your username. If you don’t know it, it’s the part after
C:/Users/when you opencmd.IdentityFile "C:/Users/[YOURUSERNAME]/.ssh/id_rsa"Linux/macOS
IdentityFile ~/.ssh/id_rsa
A potential completed config might look like this:
Host vscode.cse.unsw.edu.au
    HostName vscode.cse.unsw.edu.au
    User z5555555
    IdentityFile "C:/Users/Bob/.ssh/id_rsa

Host vscode2.cse.unsw.edu.au
    HostName vscode2.cse.unsw.edu.au
    User z5555555
    IdentityFile "C:/Users/Bob/.ssh/id_rsa
Once you’ve done this, you should be able to open Remote-SSH in VS Code without requiring a password.
If you need to add another public key to authorized_keys (for another computer), you can enter it on a new line.
Coding on your own computer
This guide was once part of a much larger guide which involved setting up to allow you to code on your own computer. However, this was much more than what most 1511 students need. It’s worth noting that you need to have an internet connection for SSH to work. If your train route has poor reception, and you want to code on the train, you would need an alternative.
Even then, I would still recommend setting up your own local coding setup at some point. If you’re new to coding and you’re doing 1511 right now, I wouldn’t say you should worry about this. However, if you do intend on going on to study more CSE courses, I recommend that you come back over the break after term ends and check out this other post I wrote , which goes through setting up a Linux development environment if you have a Windows 10 computer, and using Git and GitHub to keep copies of your work on different computers and the internet.
Troubleshooting SSH over VS Code
If you’re having trouble connecting to VS Code, a fix that tends to work is
- Log in to the CSE servers using TigerVNC.
- Open a terminal.
- Run the following command:
rm -r ~/.vscode-server. Make sure to copy and paste this command carefully.
Alternatively, if you know how to open a Command Prompt/Terminal, you can run ssh -t z5555555@cse.unsw.edu.au "rm -r ~/.vscode-server", replacing with your own zID.
Have feedback, or want to reach out?
If you’ve spotted an error, or have any suggestions or improvements that I can make, feel free to contact me! My details are at the bottom of this page.
Official guide
Despite myself and the people being acknowledged below currently being employed by the School of CSE, this blogpost doesn’t necessarily represent the views of my employer.
Acknowledgements
Thanks to the following people who’ve looked over this guide and provided feedback!